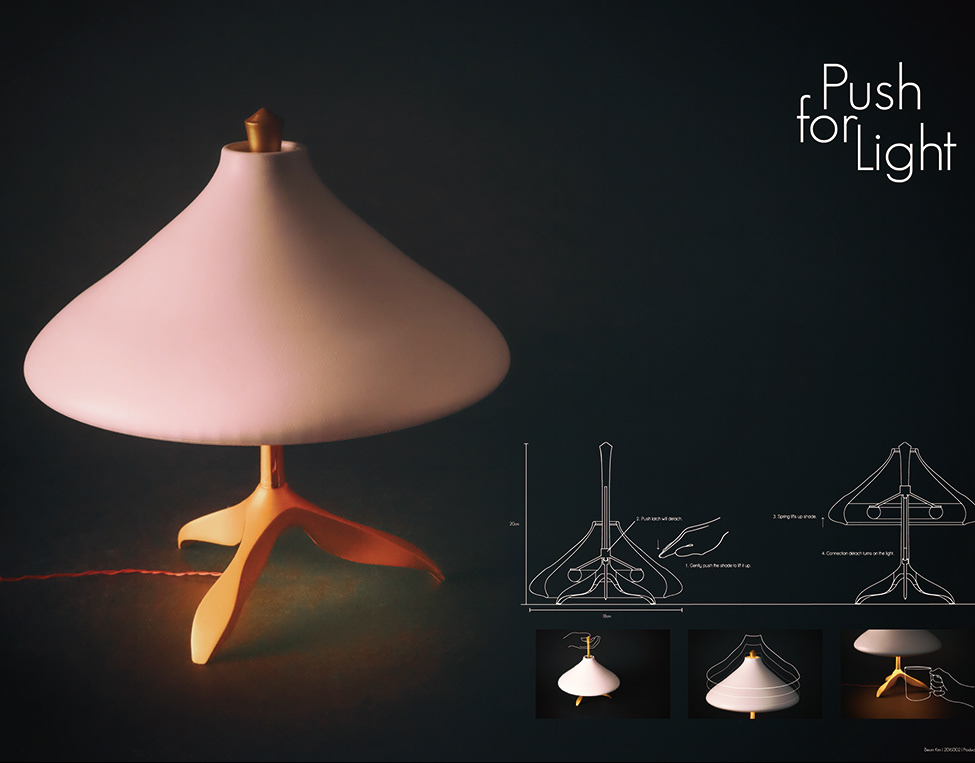
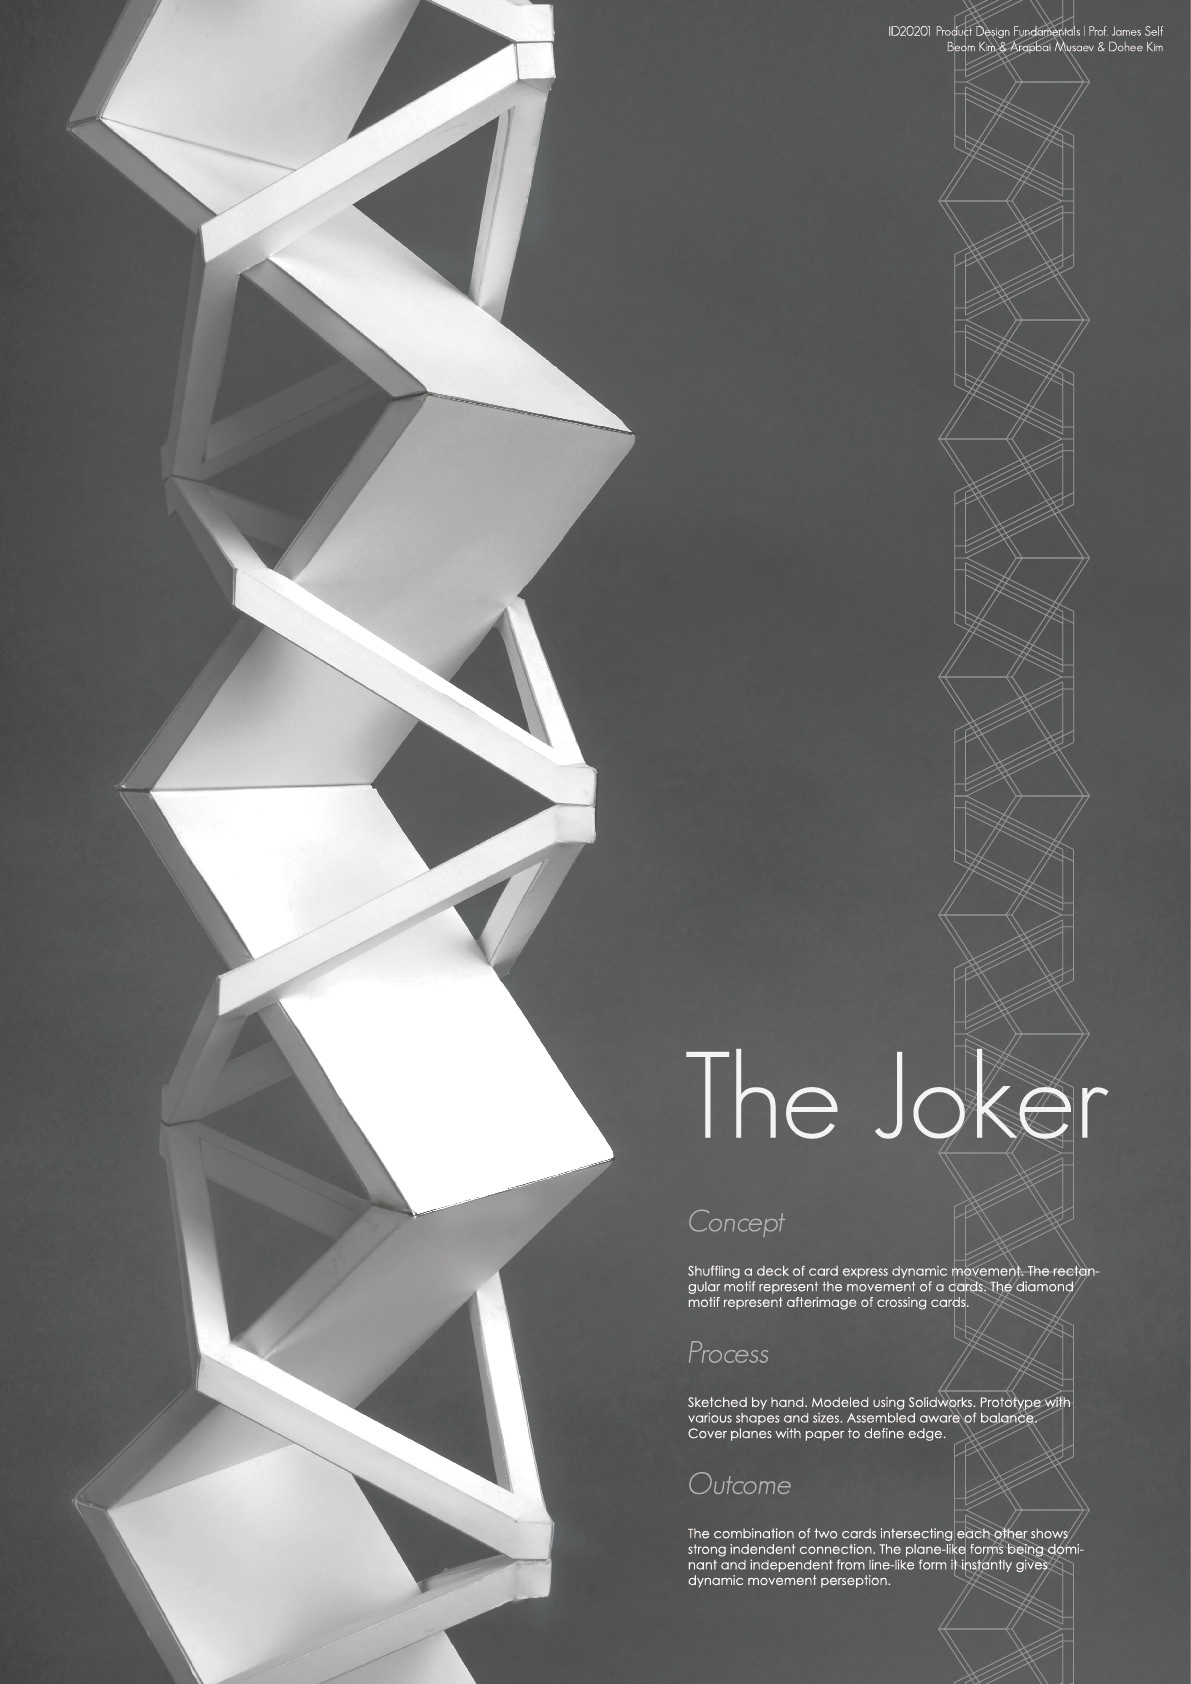
P1 - PAPER TOWER : THE JOKER
DEFINING CONCEPT
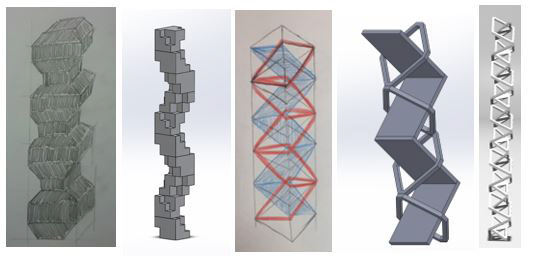
- Right after out team has assembled, we quickly bring with 3 different idea with each concept. My concepts were helix-like form with dynamic movement. After short discuss, we agreed to proceed with Dohee’s design, but with dynamic twist.
- The shuffling card idea is come out at this stage. The afterimage of each falling card intersect each other and create smooth X shape between motif. To represent this image, I separated that illusion into plane-like form and line-like form.
- What I decide to attempt is put a front face of tower into side angle. If looking up to center directly, It actually showing left/right view of plane-like form. The side view of this tower lookalike double helix but right after turning into side view, suddenly plane-like form turn into dominant element and shows movement from up to bottom.
DESIGNING PROGRESS
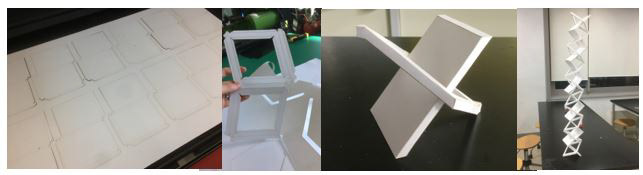
- After finishing 3D modeling, we attempt to make very first prototype, but failed miserably because the time to actually build take too long (90 min for one motif) and not stable enough to stack up to 10 motif.
- That is the point we pivoted into simpler net view and decided to cover paper plane to cover up some gaps afterwards.
- After laser-cutting all the papers, we carefully glued using white glue, and clamp with hand to make it strong. Frankly it worth the build time and stacked together very well.
FINAL OUTCOME
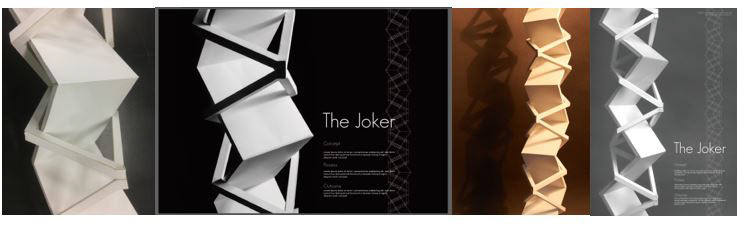
- After execution, the tower looks bit clumsy and showing a lot of gaps all over its edge. We reinforced with bent paper over plane-like forms.
- After first review of the poster, I try to put some dynamic with lighting and did experiment with lot of shadows with my camera.
- Final image were produced after serval attempt to make its depth more deeper and main feature will be pop out with contrast.
P2 - CURVILINEAR FORM COMPOSTION : THE TENSION
DEFINING CONCEPT
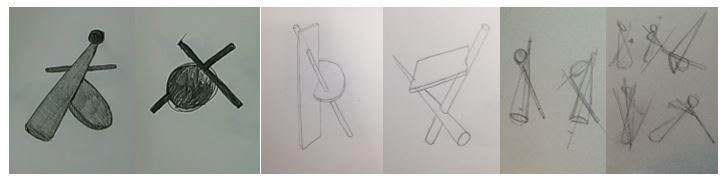
- What I bring after the long-holiday after first project was the idea of tension and arise. The perception that makes others see that the material or a form is levitating by all other elements.
- Eventually I can spot the same feeling of those on peer’s sketch. With that continuity we quickly made a prototype of each other’s idea.
- After the feedback session in the class, I decided to go for with design with plan-like form is wedged to spherical cap, and the line-like form is piercing into all 2 of those.
DESIGNING PROCESS
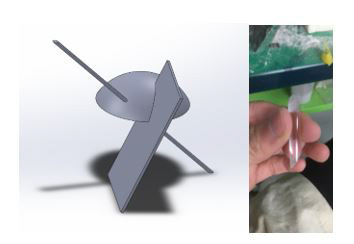
- As usual, I work with 3D modeling first. The biggest concern was the size of the cap. I found the Styrofoam ball is great size to play with it. I bought all the material and start to building. I use foamboard as plane, acrylic pole as line and Styrofoam as cap.
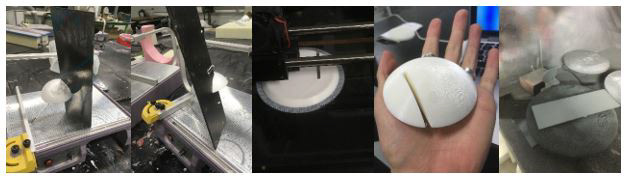
-But it was not a best option to defining a design on material first, it has some difficulty throughout the process. Plane was too thick in lengthwise that it dominates a cap with its size and presence, which is my intention to be dominant form. And the pole was short that it cannot touches the ground. I cut down side of a plane-like form to make dominant form – the spherical cap – to be stand out again.
- And the material I used for cap causes the problem. My intention was to cover it up with gesso or a putty, sand it and paint, but the professor point it out that it will take long time and the result will not good as 3d printed ones which I agreed with. I quickly measured the cap and printed out. It comes out great, but the size of a wedging gap is too deep to make perception of lightness on the design. I figure that out while priming its surface and sand it down.

- So, I created model with smaller gap, and It fits perfectly. Finalized parameter I remember is 3mm gap between 80mm diameter of cap, which is located 20mm further from one corner. 22mm width of plane-like form and length of 300mm. I don’t remember the pole length.
FINAL OUTCOME
- Next step was very straight-forwarded. I fill the dent and gaps with putty, sand it down, prime it and sand repeat. Also, I switched the pole with metallic tube that I can attach it to the baseboard with acrylic pole.
- Paint with semi-gloss paint really highlight the most important form – the spherical cap – more than the other parts.
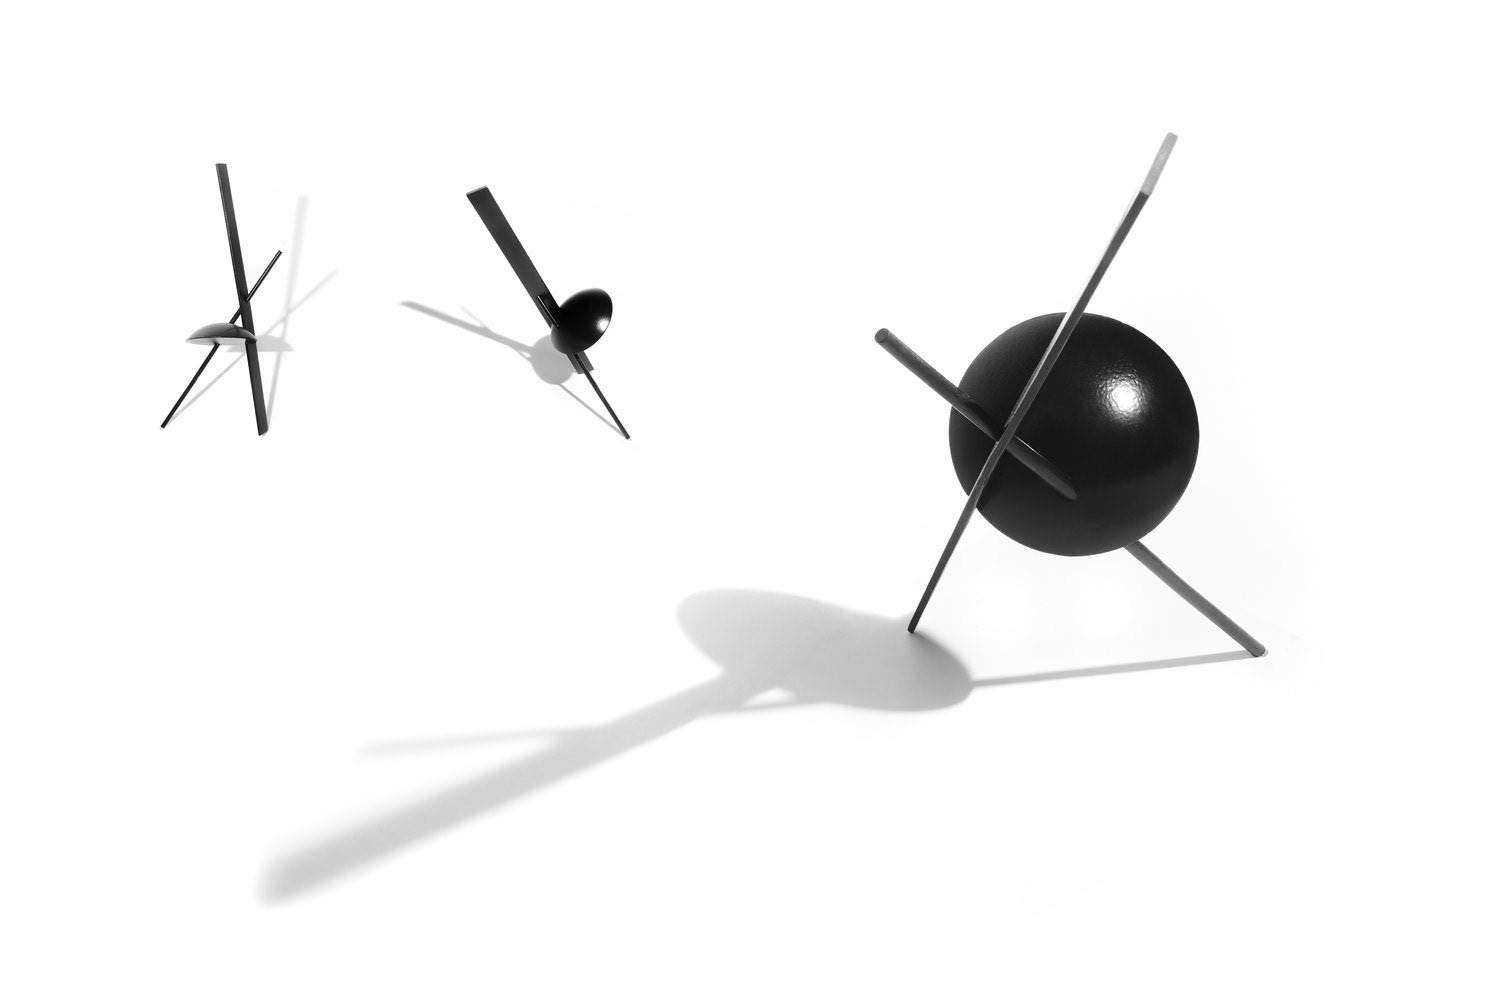
- I want to express tension that keeps pushing the form into anti-gravitational way. And it makes me make a perception that it is nor leaning onto the ground but levitated by an invisible force. The void space between piercing line makes this form looks lighter.
- As the dominant-mass like form, the cap keeps the interest first. Than it spread across the wedged side with plane like form – which is sub-dominant – and it divides in the intersection that plane-like form pierced by a line-like form. Then it flows to bottom to understand the two side is landed on the ground. But on the other side, it is hanging to the air. But there is no pole that should hold the other side to make it not fall over. That flow makes viewers to imagine the tension that keeps the mass-like form off from ground. That is why I named this combination ‘The tension’
P3 - ORGANIC FORMS : LEAN.
CAUSED PROBLEM
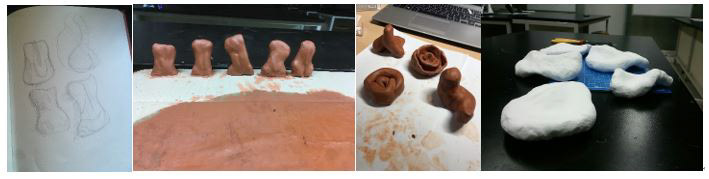
- We sketched from the beginning of the project. Surprisingly all of our sketch represents different types of sketch. For me, I like to composite a form with plane-like form and give some dynamics.
- So, in my first attempt, I created a lot of lines in my sketch. But in the process that I try to make the idea with clay, I can spot the collapse of the lines between all of my curves destroying all my intentions.
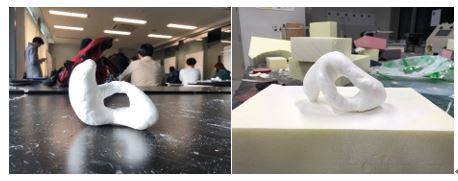
- Eventually, the Dohee’s design have picked among our critics. A mass-like form with its ‘head’ have different axis from dominant part. And have the concave through the whole body with slight curve.
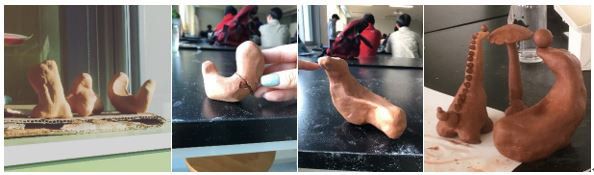
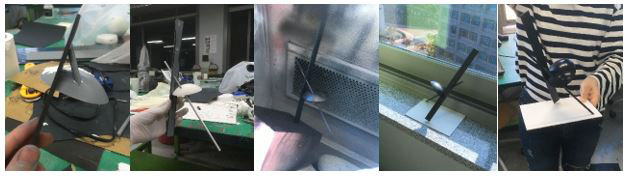
- After critic sessions with peers and professor, we actually carve out and emphasize more of concave of its body. In this stage, the sub-dominant part was higher and have clear edge line between its concave and convex.
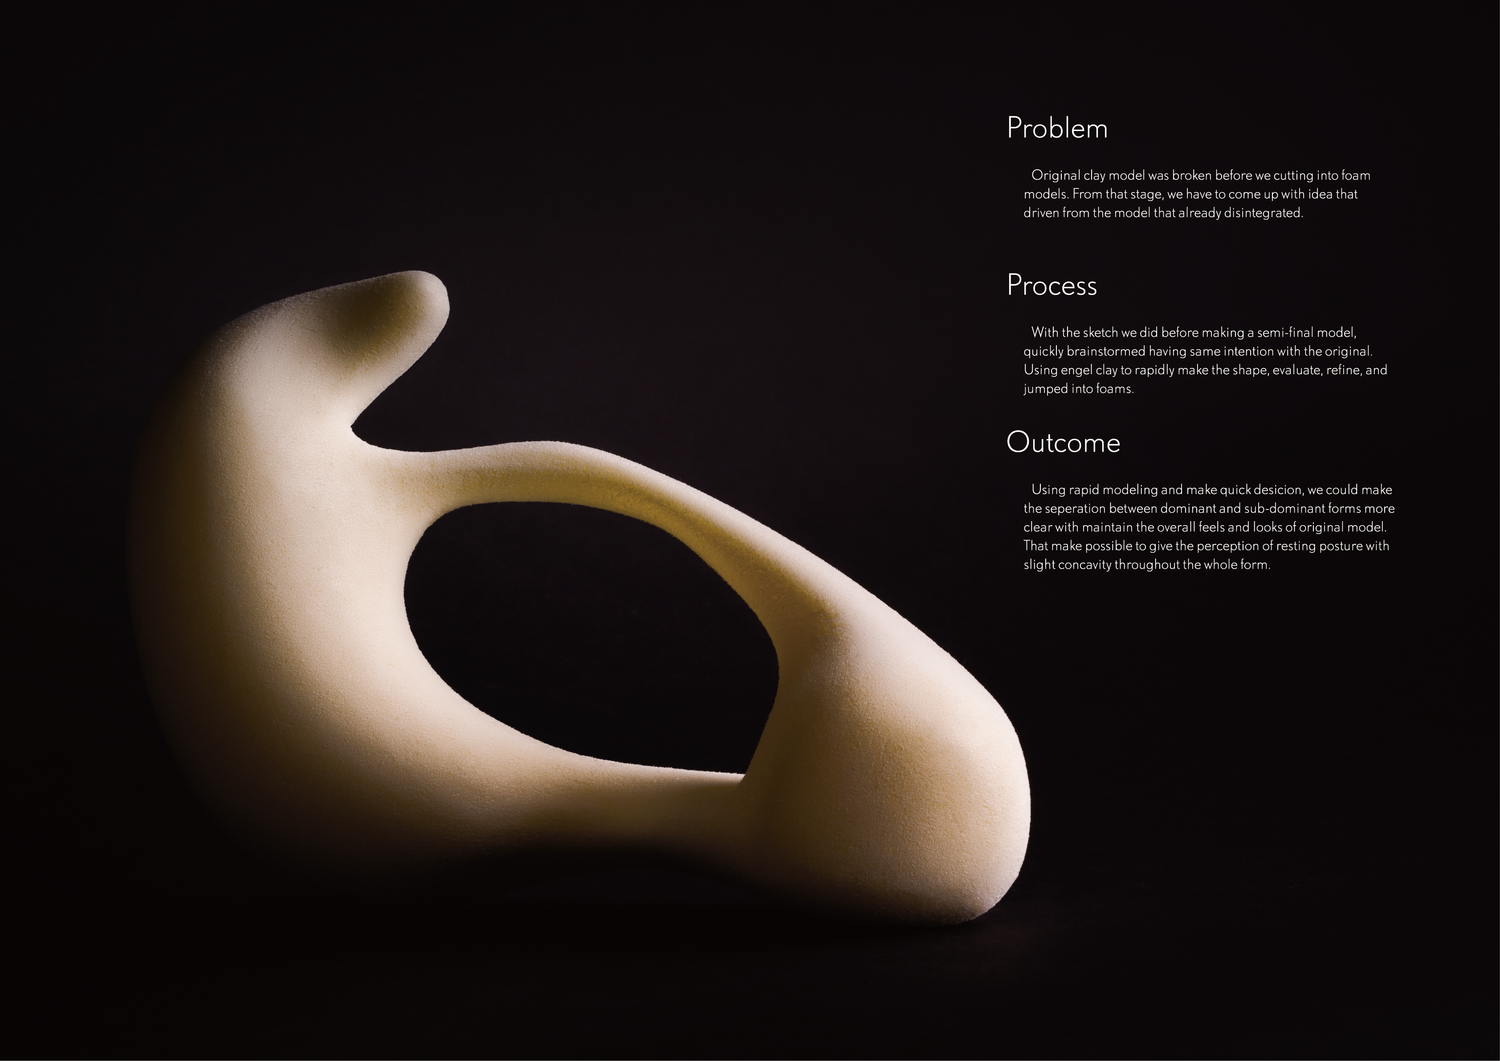
- Problem is, by mistake of one of our team members, the semi-final fully dried clay model is broken in half and can’t repaired with extra clay. With quick thinking, I made another one with extra clay remaining.
DESIGNING PROCESS
- Not usually, I couldn’t work with 3D modeling first. Because of the complexity of the model and amount of time compared making with clay is not compatible.
- For this time, we finally gathered together and brainstormed with an easily morphing clay. In this stage, inherent proportion of void space is much smaller and have convexity inside. But this angel clay is not the great material for this practice. We cannot define a lot of lines clearly at this stage and struggle. With this model, we start to manipulate with foams. Roughly sketch directly on the foam itself eyeballing the dimensions.
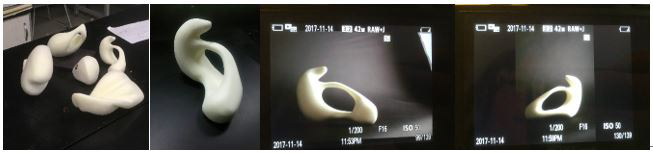
- We used hot wire cutter to cut through all the sketch lines. For the holes, I puncture a hall in the middle and put wire through. Re-connect the wire and cut out from inside.
- 400 grits to refine edge and 800 grits to smooth out. Then I took a lot of picture keep rotating form and moving the lights. And I found two angles that light and shadow compliment is form. With the votes of teammates, I pick first one showing off smooth transition and leaning effect.
FINAL OUTCOME
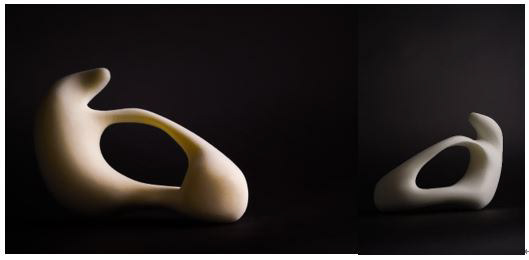
- As the dominant-mass like form, the form located on the left side is can be noticed in the first time. With the help of little thin bridge on the upper side of the void space, point of view is move across the form and goes into the sub-dominant line like form. Its curvature that convex to inside curve make viewpoint go up with the vertical axis that dominant form have, but intersect in the point that the axis is changing with more angle. And it falls down to the thin bridge again. This flow of viewpoint could relax the viewers because all of components are harmonious. Every component’s inherent proportion is designed to not overcome comparative proportions of void space. Speaking of void space, its convexity creates some tension that suction viewers intention into that space. With help of curvature with whole form, I think that is a key point of giving a perception of hugging and leaning.
- I keep imaging this product is some form of holder for another device. Its convexity is perfectly matched with bottom bridge that connect dominant part with sub-dominant part. It can give viewer some perception about leaning onto it and make it rest.
- With the different angle of axis of subordinate form combine with curve in the dominant part, a gripping motion is can be shown.
- Personally, I smoke pipes and I imagining lay down my pipe on this kind of form after use while designing and refining form.
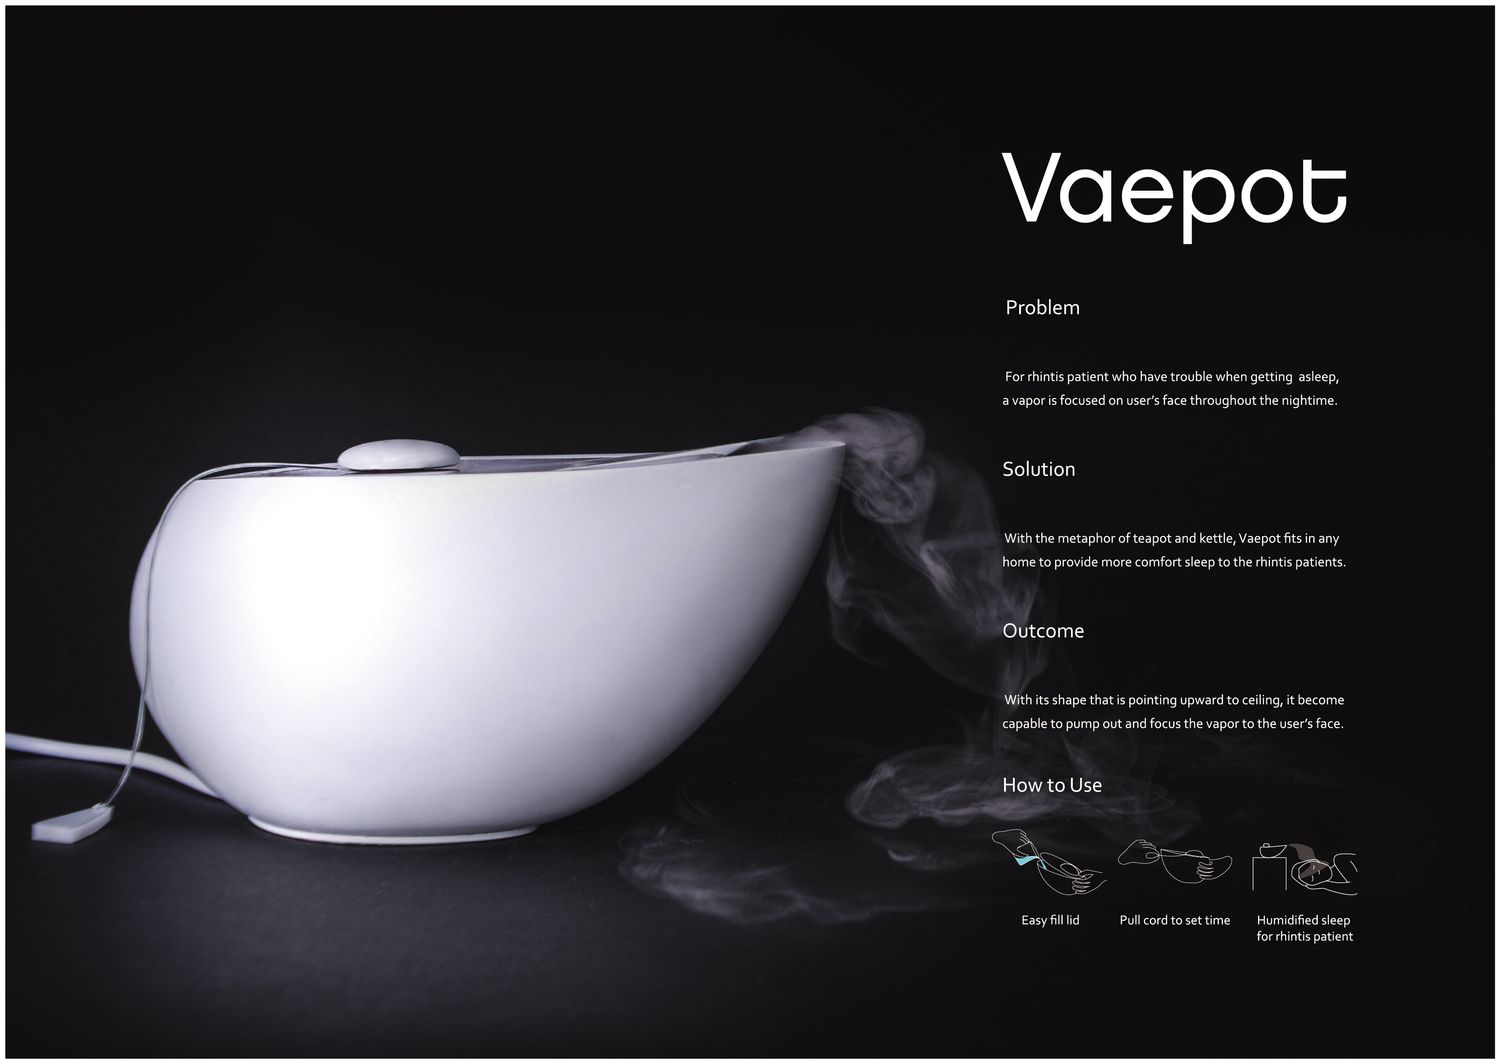
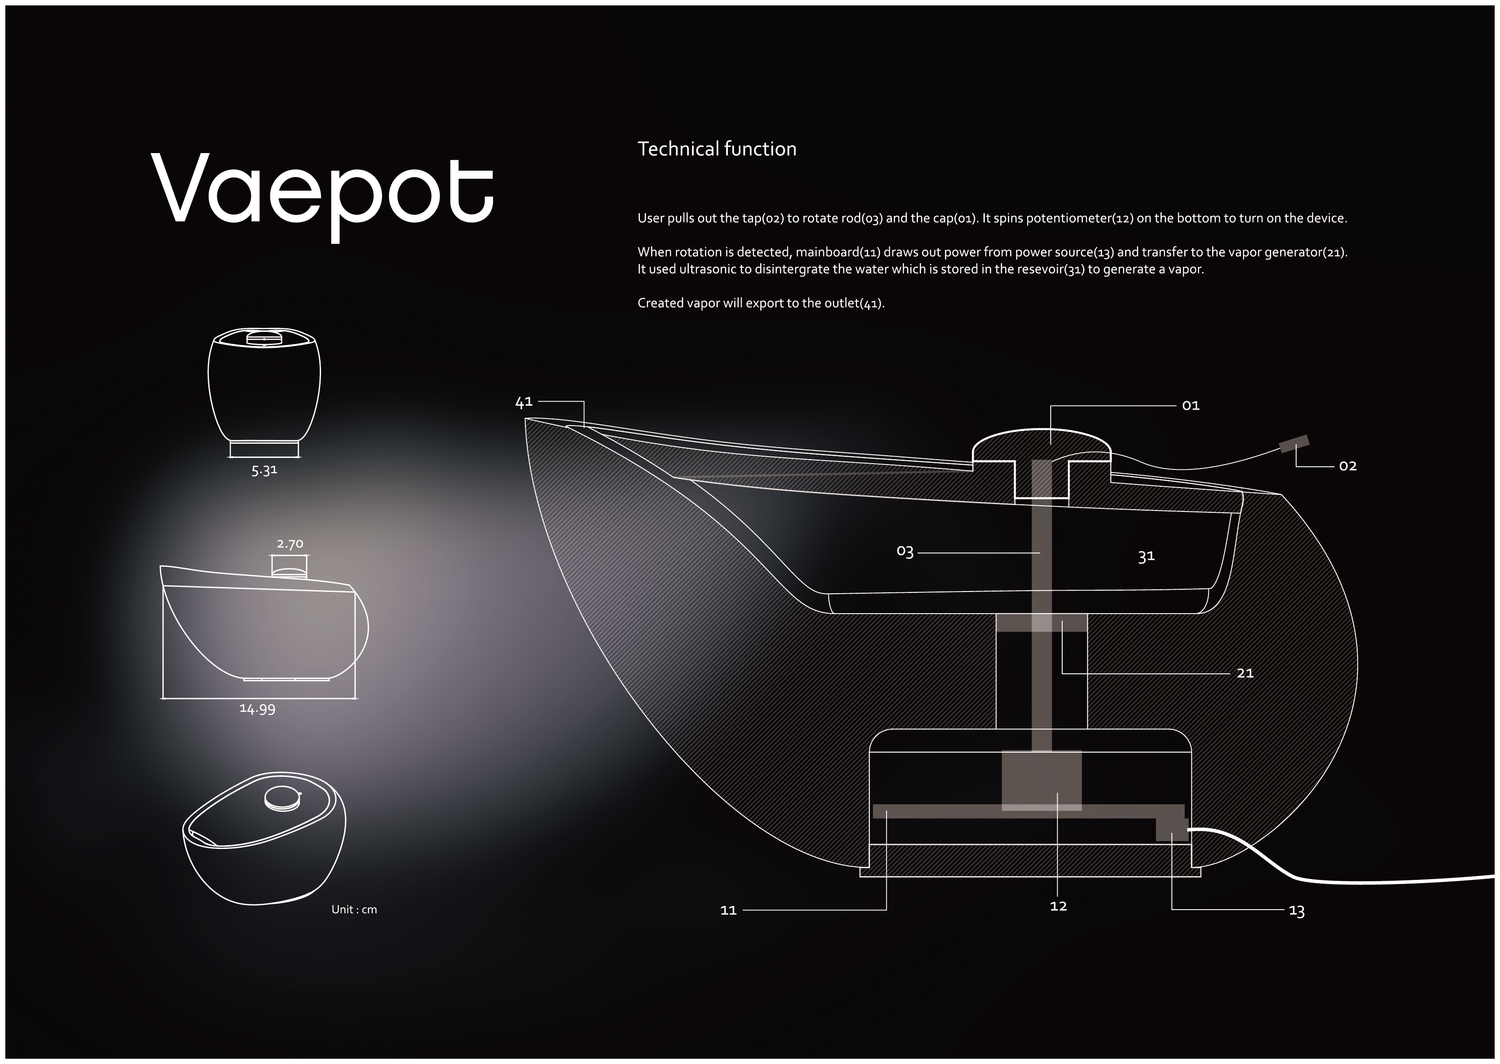
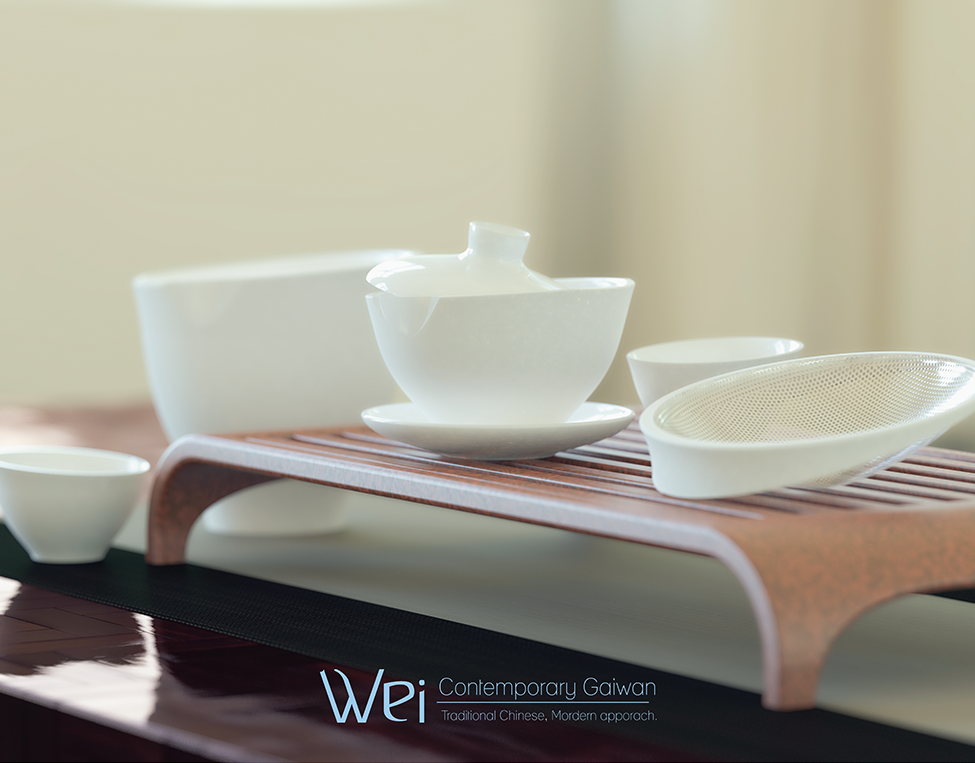
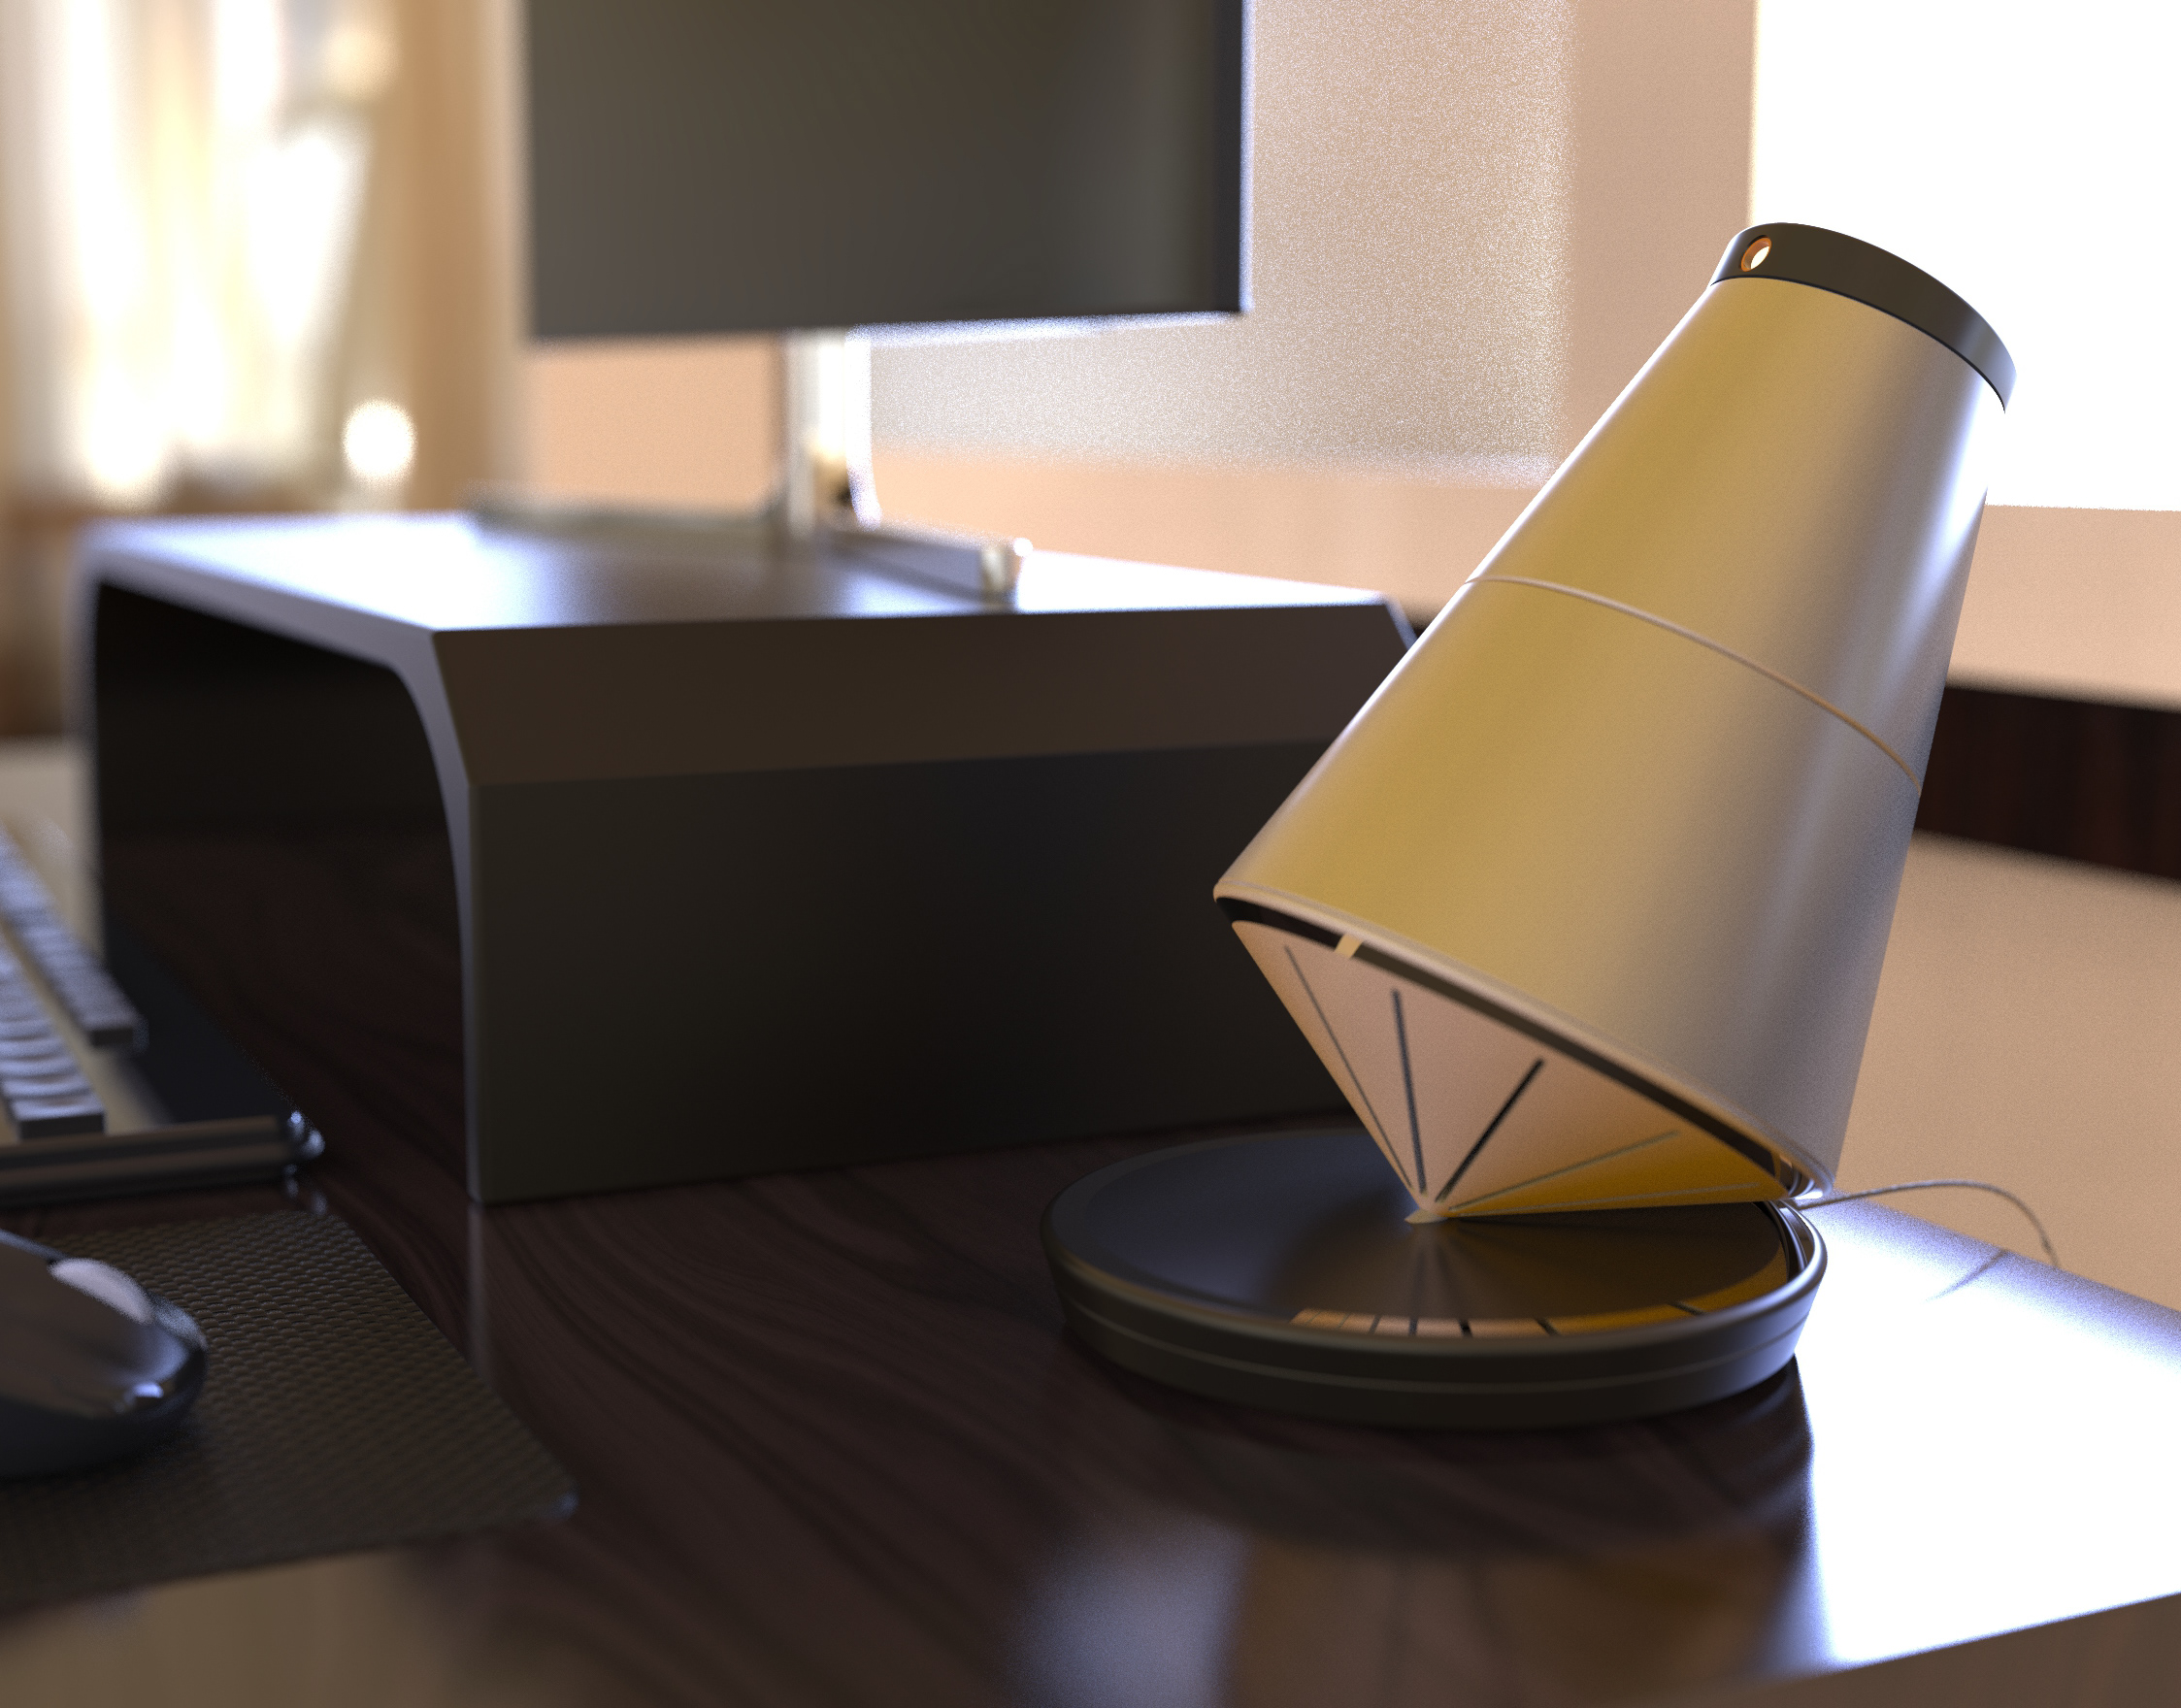
P4 - PRODUCT DESIGN - VAEPOT.
CAUSED PROBLEM
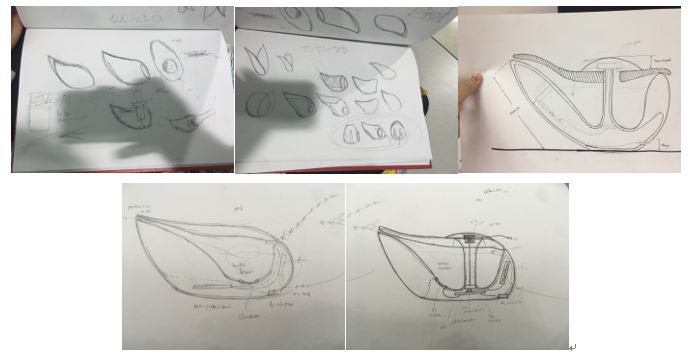
- We decided to bring a sketch in the very first meeting. All of us have decided to go for sleep context but come with different methods to make vapor. I came up with the humidifier with boiling mechanism. Strongly follow the metaphors of kettle.
- After critic session with peers, I bring with more unobvious metaphor and forms with ambiguity. Driven by the teapot and the teardrop shape, but with the mechanism that using UV disintegrator which is safe and quiet compare with boiling components.
- First division product has a large vent through the bottom to cover to all cooperative parts. But further develops, the cavity needs to be maintain some thickness and the angle of the inner part shouldn’t be negative when seen on the other side.
DESIGNING PROCESS
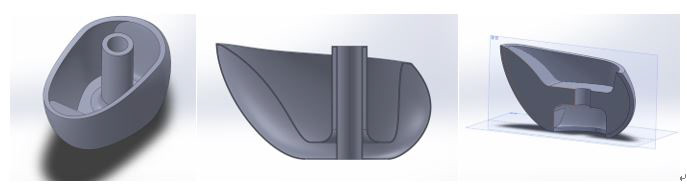
- Me and our intention was to make a 3D model, mold it and cast it with plaster to give a real feel and looks of soil and clay product. We prepared everything to mold it, but the silicone we intended to use cost a lot more than we expected. After short feedback session with professor, our second division product is decided.

- Quickly shift prototyping method from casting to 3d printing, I modeled the small parts for cover, cap, and bottom.
- We all agreed to make this prototype to work and generate vapor for the presentation, so all components were modular and can be jointed with friction.
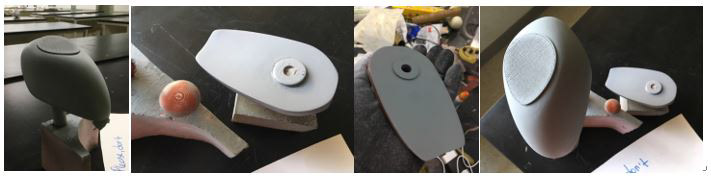
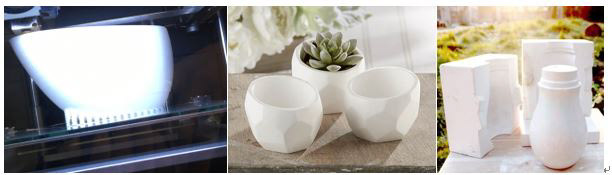
- With help of red putty, we can make the slope smooth formatted in the upper face of cover. With couple coats of priming and numerous of filling the gaps, we can finish the surface very smooth. Even we used 2000 grits of sandpaper to smooth it out.
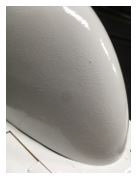
- But right after we turn into the stage of painting, something strange happened. Because the temperature of the day was below the -2, some area of the surface begins to be frozen. I have not anticipated this kind of situation, so It was very frustrating to sort it out. Eventually I sanded it all down and begin again with 400 grits of sandpaper. Even the paint was not gloss paint I wanted but the matte finish compliments the shapes even more, so I work with it.
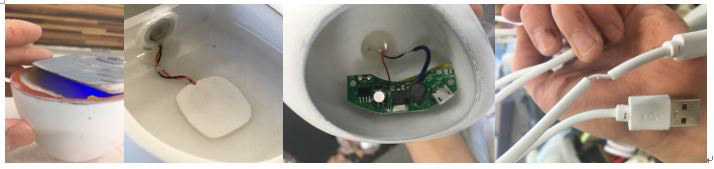
- The electronic parts were salvaged with USB type humidifier. I dissembled the whole parts and reunited them with glue gun. In the process, the wire was worn out and disjointed, so I have to re-solder them with another wire. And also the switch is cannot be controlled, so I connect them that it can work when the power cable is connected.
FINAL OUTCOME
- As the mass like form inspired by the body parts of the teapot, the form works as very dominant in the whole form composition. The pointy ends that is snout of the teapot serves as export hole of the vapor. Finally, the cover of the teapot which is vague-fied stand subordinate to the whole form. I put some interaction point over this form to let user easily figure out how to operate this product.
- And the operation process will be written below.
The user pulls out the tap (02) to rotate rod (03) and potentiometer (12) to turn on the humidifier. When signal is detected, mainboard (11) draws out power from power source (13) and transfer to the Ultrasonic vapor generator (21). It disintegrates the water which is stored in the reservoir (31) to generate a vapor. Created vapor will export to the outlet (41).
- The smooth slope that is shaped alongside of the form help the vapor to spread evenly to the export hole and go over user’s face when sleep.